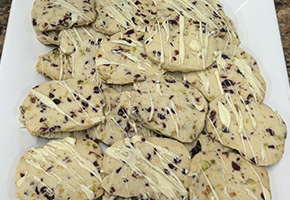
Cranberry Pistachio Shortbread Cookies

by Chef Katie Chin

Cranberry Pistachio Shortbread Cookies from Chef Katie Chin

These buttery shortbread cookies are festive little cubes with tart cranberries, nutty pistachios, and a hint of orange zest. The dough is shaped into logs and chilled, then sliced into squares so every cookie bakes up neat and uniform. A drizzle (or dip) of white chocolate makes them look like holiday gifts in cookie form – glossy, bright, and impossible to resist.

Yields: 18-24 cookies

  • 1 cup Challenge Unsalted Butter Cubes (2 cubes), softened
  • ½ cup sugar
  • Zest of 1 orange (about 1 tablespoon)
  • 1 teaspoon vanilla extract
  • ¼ teaspoon fine sea salt
  • 2 cups all-purpose flour
  • 2⅓ cup dried cranberries, roughly chopped
  • ⅓ cup pistachios, roughly chopped 1 cup white chocolate, melted
  1. In the bowl of a stand mixer fitted with the paddle attachment, cream together the butter, sugar, and orange zest until light and fluffy, about 5 minutes.
  2. Beat in the vanilla, then mix in the salt and flour until just combined.
  3. Stir in the cranberries and pistachios.
  4. Divide the dough in half and roll each portion into a log. Use plastic wrap to shape the logs into rectangles so the cookies will slice into squares later. Chill in the refrigerator at least 2 hours, or overnight.
  5. Preheat the oven to 325°F. Line two baking sheets with parchment paper.
  6. Slice the chilled dough into squares about ½ inch thick and arrange on the prepared sheets.
  7. Bake 12-15 minutes, until set but not browned. Let cool completely on a wire rack.
  8. Transfer the melted white chocolate to a piping bag (or a zip-top bag with a corner snipped off) and drizzle over half of each cookie. Alternatively, dip half of each cookie directly into the chocolate. Sprinkle with extra orange zest if desired
  9. Allow to cool until the chocolate hardens, then serve or store in an airtight container for up to a week
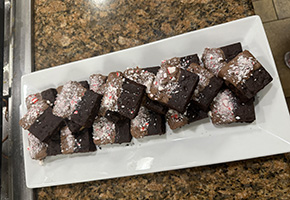
Chocolate Peppermint Cookie Bars

by Chef Katie Chin

Chocolate Peppermint Cookie Bars from Chef Katie Chin

These cookie bars are rich, fudgy, and full of holiday cheer. Baked as one pan and sliced into neat squares, they skip the hassle of shaping individual cookies. A dip in melted dark chocolate and a sprinkle of crushed peppermints (or candy canes) give them that festive finish – dark, glossy, and sparkling with red and white.

Yield: Makes about 16 bars

  • ½ cup Challenge Salted Butter cube (1 cube), softened
  • ½ cup granulated sugar
  • ½ cup brown sugar
  • 2 large eggs, room temperature
  • 1 teaspoon peppermint extract
  • 1½ cups all-purpose flour
  • ½ cup cocoa powder
  • 1 teaspoon baking soda
  • ½ teaspoon salt
  • 8 ounces dark chocolate, divided (half for the batter, half for dipping)
  • ½ cup crushed peppermints or candy canes
  1. Preheat the oven to 350°F. Line a 9×13-inch baking pan with parchment paper, leaving an overhang for easy removal.
  2. In a stand mixer fitted with the paddle attachment, beat the butter, granulated sugar, and brown sugar until light and fluffy, about 3-4 minutes.
  3. Add the eggs one at a time, mixing well after each, then mix in the peppermint extract.
  4. In a separate bowl, whisk together the flour, cocoa powder, baking soda, and salt.
    Gradually add this dry mixture to the wet ingredients on low speed until just combined.
  5. Stir in 4 ounces of the dark chocolate (chopped). Spread the batter evenly into the prepared pan.
  6. Bake 20-25 minutes, until set in the center. Let cool completely in the pan, then lift out using the parchment and slice into squares.
  7. Melt the remaining 4 ounces of dark chocolate in the microwave in 20-second bursts, stirring until smooth. Dip half of each bar into the chocolate, then sprinkle with crushed peppermints.
  8. Place on parchment paper to set until the chocolate hardens. Store in an airtight container for up to a week.

End-of-Season Vegetable Ferment

Recipe excerpt from:
The Modern Pioneer Pantry
by Mary Bryant Shrader

As the growing season winds down, it’s the perfect time to make an End-of-Season Vegetable Ferment, which will allow you to harness the rich flavors and nutrients of a variety of vegetables. The simple fermentation process enhances the vegetables’ natural taste. It adds beneficial probiotics, making it a nutritious and delicious addition to your meals in place of the more commonly pickled veggies. Best of all, you can make this ferment with vegetable scraps left over from other fermentation or home canning projects. Pretty much any combination of nonstarchy vegetables will work in this recipe.

Prep Time: 20 Minutes
Fermentation Time: 7-14 Days
Total Time: 7-14 Days 20 Minutes
Yield: 1 quart

Equipment

  • Quart (32oz) jar with a screw-on lid
  • Small bowl
  • Fermentation weight or small jar no larger than 4oz (optional)
  • pH strips

Ingredients

  • Mixed end-of-season nonstarchy vegetables, such as asparagus, beets, carrots, bell peppers, spicy peppers, yellow squash, and zucchini (see Cook’s Notes)
  • 1 tsp mustard seeds
  • 1 tsp black peppercorns
  • Small bunch of fresh herbs, such as chives, dill, parsley, or tarragon (optional)
  • 1 tbsp fine-ground sea salt
  • ¼ cup chlorine-free water, plus more if needed
  1. Wash and chop the vegetables into bite-size pieces.
  2. Place the mixed vegetables into the quart jar, alternating layers with a few mustard seeds and peppercorns and the fresh herbs (if using). Pack everything tightly, leaving a 1-inch (2.5-com) headspace.
  3. In a small bowl, dissolve the salt in the ¼ cup water. This is your brine.
  4. Pour the brine over the vegetables, ensuring they are completely submerged. Add additional water, if needed, leaving a 1-inch (2.5 cm) headspace. If necessary, use a fermentation weight or small glass jar to keep the vegetables below the brine. Place the lid on the jar and tighten.
  5. Place the jar in a shallow bowl (to catch any seepage) in an area away from direct sunlight. For best results, you should maintain the temperature between 68°F and 72°F (20°C and 22°C). This temperature should be attainable since this is an end-of-season ferment when temperatures start to cool.
  6. After the first few days of the fermentation process, you should see bubbles begin to form in the jar and float up the sides to the top. This is carbon dioxide, a normal by-product of the fermentation process. Once you see the bubbles forming, loosen the lid of the jar and allow the gas to escape, then retighten the lid. Continue releasing the gas from the jar each day during the fermentation process.
  7. After 7 days, open the jar and set the lid aside. Examine the ferment. It should look somewhat effervescent and have a pleasant, somewhat tangy aroma similar to pickled vegetables. Use pH strips to determine the acidity level. If it is 4.6 or below, taste the ferment. (If you see any mold of the ferment has a foul odor, it will need to be discarded.)
  8. If the texture and taste are to your liking, it is time to refrigerate the jar. Keep in mind that initially the bring clinging to the vegetables may be a bit on the salty side, but once refrigerated, the vegetables will absorb more of the brine and become more tasty, and the bring clinging to them will be less salty. If you want the vegetables to have more tang, you can let them ferment for up to 14 days.
  9. Once the vegetables are to your liking, transfer the jar to the refrigerator, placing it in the door or on the top shelf. Alternative storage options include a cellar or root cellar if those locations can properly maintain a temperature of approximately 40°F (4°C).
  10. Fermented end-of-season vegetables will stay at peak freshness in your refrigerator for up to 6 months.

Cook’s Notes

Can you include green beans in your end-of-season vegetable ferment?

Unfortunately, there is some disagreement over this. I side with the camp the believes green beans should generally not be fermented raw because they contain naturally present toxins called lectins. To deactivate these substances, the green beans need to be blanched first. The drawback to blanching them before fermenting them is that the blanching process will kill the natural yeasts and good bacteria that are present on all raw vegetables. Will there still be some yeasts and good bacteria from the other vegetables in the mix? Yes, and those might be sufficient to foster a successful fermentation. You also have the option of adding some cultured whey or a bit of the brine from a previous ferment to help the fermentation process get off to a good start. However, all that said, I simply prefer to home can green beans or blanch them and then pickle them.

“Excerpted from The Modern Pioneer Pantry reprinted by permission of DK, a division of Penguin Random House LLC. Copyright © 2025 by Mary Bryant Shrader”
 
Photography credit: Kimberly Davis

Fermented Strawberry Soda

Fermented Strawberry Soda served in four glasses with mason jar

Recipe excerpt from:
The Modern Pioneer Pantry
by Mary Bryant Shrader

If you have ever made homemade ginger ale. you will love this variation on a classic. Homemade fermented strawberry soda is a delightful, probiotic-rich drink that refreshes and supports gut health. You’ll make this effervescent beverage using a ginger bug, which acts as a natural starter culture. The process is simple and yields a lightly sweet and tangy soda that’s perfect for summer days. This homemade soda is an excellent alternative to store-bought versions, offering a refreshing and healthy drink for the whole family.

Prep Time: 15 Minutes
Fermentation Time: 2-4 Days
Total Time: 2-4 Days 15 Minutes
Yield: 4 Servings

Equipment

  • Blender or food processor Colander or fine-mesh strainer flower sack towel or cheese cloth
  • Large Bowl
  • Half-gallon (64oz) jar with screw on lid (you need sufficient space for stirring with no mess)
  • Narrow-mouth funnel
  • 4 glass bottles (approximately 4 oz each) with screw on caps

Ingredients

  • 6 cups fresh strawberries, washed, stemmed removed, and sliced
  • ½ cup granulated sugar
  • Juice of 1 medium lemon
  • ¼ cup Ginger Bug (see Cook’s Notes)
  • Chlorine-free water
  1. Puree the strawberries with the sugar and lemon juice in a blender or food processor.
  2. Line a colander or fine-mesh strainer with a flour sack towel or cheesecloth, place it over a large bowl, and strain the mixture.
  3. Add the Ginger Bug to the liquid in the bowl and add enough water to make 4 cups of liquid.
  4. Pour the liquid into the jar. Place the lid on the jar and tighten.
  5. Place the jar in an area away from direct sunlight. For best results, you should maintain the temperature between 68 ° F and 72° F (20 ° C and 22° C). On the floor of a cool, dark pantry is a good option, but the fermentation happens quickly, so a bit cooler or warmer will still work. The fermentation time may vary by 1 day, one way or the other.
  6. Within 24 hours, you should see bubbles begin to form in the jar and float to the top. This is carbon dioxide, a normal by-product of the fermentation process. Loosen the lid of the jar, allow the gas to escape, then retighten the lid.
  7. Since pH strips do not work well with highly colored ferments, use your eyes and nose to determine success. By the second day, this soda should look somewhat effervescent and have a pleasant strawberry aroma. Unfortunately, if you see any mold or the soda has a foul odor, it will need to be discarded.
  8. If the soda looks to be progressing along nicely, taste it.
  9. If you like the taste of the soda, you can begin decanting it as early as the second day, but you can allow it to ferment for up to 4 days. It will become more effervescent and less sweet the longer it ferments. Use a funnel to decant the soda into glass bottles with screw-on caps. Leave a 2-inch (5-cm) headspace in each bottle to allow for any additional fermentation. Refrigerate.
  10. The fermented strawberry soda will stay fresh for up to 4 weeks in the refrigerator but will lose carbonation over time. To retain a greater level of carbonation, you will need to decant the soda in swing-top air-tight bottles specifically made for carbonated beverages. But I generally don’t recommend this. Swing-top bottles are at risk of exploding, so great caution should be taken when choosing to use them.

Cook’s Notes

How to make a Ginger Bug: Making a Ginger Bug is an easy way to create a fermentation starter for probiotic-rich homemade sodas. This recipe only takes a few minutes of daily preparation over 5 days. The result is a bubbly, gut-friendly beverage starter.

Prep Time: 15 Minutes
Fermentation Time: 5 Days
Total Time: 5 Days 15 Minutes
Yield: Approximately 1 ½ Cups

Equipment

  • Quart (32oz) glass jar with screw on lid

Ingredients

  • 10 tbsp freshly grated peeled ginger, divided
  • 5 tbsp granulated sugar, divided
  • 10 tbsp filtered, chlorine-free water, divided
  1. Add 2 tablespoons grated ginger, 1 tablespoon sugar, and 2 tablespoons water to the jar. Stir well. Place the lid on the jar and tighten. Place the jar in a warm area away from direct sunlight for 24 hours.
  2. Repeat Step l each day for the next 4 days.
  3. After 5 days, your Ginger Bug is ready to use.
  4. You can store any remaining Ginger Bug in the jar at room temperature, but it must be fed every day, as stated in Step 1. Only plan on doing this if you make a lot of fermented soda. Otherwise, simply refrigerate your Ginger Bug until you are ready to make a new batch of fermented soda. (Refrigeration slows down the fermentation process and puts your Ginger Bug to “sleep.”) You will need to wake up your Ginger Bug with a few daily feedings until it is bubbly again, so plan ahead.

“Excerpted from The Modern Pioneer Pantry reprinted by permission of DK, a division of Penguin Random House LLC. Copyright © 2025 by Mary Bryant Shrader”
 
Photography credit: Kimberly Davis

Hatch Big Game Chili

Hatch Big Game Chili being served at Melissa's Produce

Recipe excerpt from:
Hatch Pepper Cookbook
by Melissa’s World Variety Produce

  • 2 pounds ground beef
  • 1 tablespoon olive oil
  • 1 medium onion, chopped
  • 1 medium red onion, chopped
  • 1 cup red bell pepper, chopped
  • 8 Hatch chiles, roasted, peeled and seeded, chopped
  • 1 15 ounce canned tomato sauce
  • 2 packages Steamed Red Kidney Beans
  • 1 28 ounce canned diced tomatoes
  • 2 teaspoons cumin powder
  • 1 ½ teaspoons black pepper
  • 4 cups water

Brown ground beef in a large saucepan. Remove from pan and set aside. Heat oil in same saucepan, sauté onions and bell peppers, until translucent. Add Hatch chiles and beef to onion mixture. Add the rest of the ingredients, bring to a boil. Lower heat and simmer 1 hour.

Makes 8 servings.

Hatch Chile Deviled Eggs

Hatch Chile Deviled Eggs

Recipe excerpt from:
Hatch Pepper Cookbook
by Melissa’s World Variety Produce

  • 12 large eggs
  • ½ cup mayonnaise
  • 1 teaspoon dry mustard
  • 2 tablespoons sweet pickle relish
  • Salt and freshly ground black pepper
  • 2 teaspoons Melissa’s Hatch Chile Powder

In a large pot, combine the eggs with enough cold water to cover by 1 inch. Set the pot over high heat and bring the water to a boil. When the water comes to a boil, remove the pot from the heat, then cover and let sit for 17 minutes.

Transfer the eggs to a bowl of ice water. When they are cool enough to handle, carefully peel the eggs and rinse them. Slice each egg in half lengthwise. Remove the yolks and transfer them to a mixing bowl. Reserve the whites.

Mash the yolks with a fork. Add the mayonnaise, mustard, and relish. Season the mixture with salt and pepper. Mix until creamy.

Pipe or scoop the yolk mixture into the reserved egg white halves. Arrange on a platter or serving dish and sprinkle with Hatch Chile powder. Keep refrigerated until ready to serve, up to 24 hours.

Fireworks Black Bean and Mango Salad

Black Bean and Mango Salad recipe by Ellen Kanner

Recipe excerpt from:
Miami Vegan: Plant Based Recipes From the To Your Table
by Ellen Kanner

I created this recipe a few years ago to bring to my friend D’s annual Fourth of July party. I wasn’t planning to, but that day, she called and said, “Hey, are you still vegan?” Um, yeah, now and forever. The party spread turned out to be not vegan-friendly, and D asked if I could bring something that was. So with little warning, and using what I had in the kitchen, I came up with a winner.
Fireworks Black Bean and Mango Salad combines tender, earthy-flavored black beans, sweet, juicy mango, tart lime, sweet and hot peppers, soft, fresh greens, and buttery toasted pepitas—pumpkin seeds—offer healthy fats and fun crunch. It’s a no-cook wonder that can sit out on a picnic table for hours without wilting.

Oil-free fans, this is your moment. And even if you’re not oil-free, this is your salad. It’s naked—in a sexy way, I hope—but I mean it doesn’t have a real dressing. It doesn’t need it. The cumin, lime juice, and mango create the flavor, and the mango also provides the right amount of moisture that holds everything together. These flavors, textures, and colors come together like a burst of fireworks. Like America itself.

How to serve: Great as part of a buffet or picnic. Nice with cornbread or hoecakes.

Ingredients

  • 1 jalapeño, minced
  • 1 red pepper, diced (about 1 cup)
  • 2 stalks celery chopped fine (about 1 cup)
  • 2 15-ounce cans black beans rinsed and drained or 4 cups cooked black beans
  • 1 teaspoon cumin
  • juice of 1/2 lime (about 1 tablespoon)
  • 2 mangos, peeled and diced (about 2 cups)
  • 1 bunch cilantro chopped
  • sea salt and fresh ground pepper to
  • taste
  • 1/4 cup toasted pepitas pumpkin seeds for garnish, optional but add- ing fabulous crunch, not to mention goodly amounts of manganese and magnesium
  • 3–4 cups fresh greens like spinach, arugula or frisée

Instructions

  • In a large bowl, gently mix together jala- peño, diced red pepper, and celery. Add the black beans and combine well.
  • Add the cumin and the lime and toss to coat.
  • Just before serving, add the chopped mangos and chopped cilantro to the black beans. Season to taste. Place black beans and mango atop greens and serve at once, garnishing with toasted pepitas, if you like (and you will).
  • Serves 4.

Guava Cream Cheese Pastry— Pastelitos de Guayaba

Guava Cream Cheese Pastries by Ellen Kanner

Recipe excerpt from:
Miami Vegan: Plant Based Recipes From the To Your Table
by Ellen Kanner

Puff pastry, vegan cream cheese, and guava paste, all gettable at your grocery store, come together for something easy to make, Instagram-worthy, and sublime to eat—crispy, flaky, creamy, sticky, and sweet in every bite.

How to serve: Pastelitos de guayaba are eaten at breakfast with a café Cubano and enjoyed throughout the day just because we can. Pastelitos taste best right out of the oven. They’ll be snatched up for brunch, so make a double batch.

Ingredients

  • 1 14-ounce package frozen puff pastry*
  • 1 8-ounce package vegan cream cheese, chilled**
  • 4 tablespoons powdered sugar
  • 7–8 ounces guava paste (half a 14-ounce package)***

Instructions

  • Preheat oven to 400°F. Line a rimmed baking sheet with a parchment sheet or Silpat.
  • Unroll one sheet of puff pastry and fit onto the prepared baking sheet.
  • In a small bowl, mix together the vegan cream cheese and powdered sugar until smooth and creamy. Powdered sugar contains a little cornstarch for lightness and structure. It helps the cream cheese here keep its shape and not go totally oozy on you.
  • Pop the vegan cream cheese mixture in the freezer for a few minutes while you roll out the puff pastry.
  • Take about half the brick of guava paste and slice it thinly, reserving the rest for another use.
  • Spread cream cheese evenly on the bottom sheet of pastry, covering as much as possible and leaving just a little pastry bare at the edges.
  • Fit the slices of guava paste on top, again covering as much as possible.
  • Roll out the remaining sheet of puff pastry. Fit it on top of the guava and cream cheese. Gently press the edges of the pastry sheets together.
  • Make diagonal slits across the top, about 2 inches apart, to let steam escape. Then lightly score the pastry into 16 individual pieces, but do not separate them.

* Choose frozen puff pastry sheets made with palm oil, not butter or, dios mio, lard.
** Different vegan cream cheese brands perform differently. Choose a kind that’s firm, rather than spreadable. You can also omit the vegan cream cheese entirely; make all-guava pastries and get on with your life.
*** Guava paste is available in every Miami grocery store, many grocery stores throughout the country, online, and in specialty markets. Brands include Conchita and Iberia.

Melissa’s Endive Boats

Belgian Endive Boat at Melissa's World Variety Produce

by Tom Fraker
Melissa’s World Variety Produce

Fill the endive leaves in the order of the ingredients beginning with the Asian pear and ending with the blue cheese. Finish with a drizzle of honey and a sprinkle of the sea bean and serve. Makes 14-16 boats.

Ratatouille

Ratatouille recipe by Meathead

Recipe excerpt from:
The Meathead Method
by Meathead

Yep, Meathead makes vegan dishes occasionally. You may never make ratatouille the Disney way again. I like to serve it over pasta, but you can serve it on couscous or rice. It is even good cold, so bring it to a party. Try the Eggplant Parm on the website and in the last book.

MAKES 6 servings
TAKES 15 minutes to prep, about 20 minutes to cook

  • 1 pound eggplant
  • 1 pound zucchini or yellow squash
  • 1 pound meaty tomatoes, such as Romas or San Marzanos
  • 1 large red, yellow, or orange bell pepper, or a mix
  • 1 large onion
  • Morton Coarse Kosher Salt
  • Inexpensive olive oil
  • 2 garlic cloves
  • 2 teaspoons fresh thyme
  • 1/4 teaspoon red pepper flakes
  • Medium-grind black pepper
  • 16 ounces dried pasta (I like farfalle / little bow ties)
  • Fresh basil, oregano, chives, and/or thyme, for garnish
  • Grated Parmigiano-Reggiano cheese, for garnish
  • OPTIONAL: High-quality olive oil
  1. PREP THE VEGGIES. With a potato peeler, peel 3 or 4 stripes of skin off the eggplant, top to bottom. You want to get some of the skin off but leave at least half on. The skin has flavor and nutrients, but if you don’t take some off, it is more difficult to cut and chew. Cut the eggplant crosswise into discs 1/2 inch thick. Cut the zucchini lengthwise into 1/2-inch-thickplanks or crosswise into discs. Cut the tomatoes in half from top to bottom. Cut the bell pepper in half lengthwise and remove the seeds and stems. Peel the onion, cut off the stem and top ends, and cut it in half across the equator. Insert two toothpicks into each half from the sides to hold them together.
  2. FIRE UP. Get the grill running in 2 zones and get the hot side up to about Warp 7.
  3. GRILL THE VEGGIES. Dump the eggplant, zucchini, tomatoes, and onion onto a sheet pan, sprinkle one side lightly with salt, and paint all sides with olive oil. Add the veggies to the grill grates over the hot side and grill until they get a few brown stripes, but don’t cook until they turn to mush. Leave a little crunch. As they finish, you can snatch the skins off the tomatoes and discard them; they should come off easily with a pinch. Chop the rest of the veggies (not the tomatoes) into bite-sized chunks and slide them into a bowl.
  4. MAKE THE TOMATO SAUCE. Peel and mince or press the garlic. In a cast-iron skillet set over direct heat on the grill (or on a burner), heat 1 tablespoon inexpensive olive oil until hot. Add the garlic, thyme, pepper flakes, and black pepper to taste, and cook only for about a minute, enough to kill the garlic’s rawness. Add the tomatoes, smush them, and cook until the sauce thickens a bit, perhaps 5 minutes. Add the rest of the veggies and liquid from the bowl, stir, and warm over medium heat.
  5. PASTA. On the stovetop, bring 1 gallon of water to a boil for the pasta and add about 1 teaspoon of salt. Add the pasta and cook to al dente according to the package directions.
  6. SERVE. Drain the pasta, move it to a big bowl, pour on the tomato sauce, then pile on the rest of the veggies. Garnish and gently mix the herbs and Parmigiano in so they warm and exude their perfume. If you like, do as they do in Italy, and drizzle a high-quality olive oil over the top of each individual serving (especially if you plan to serve it cold).

From The Meathead Method by Meathead. Copyright © 2025 by AmazingRibs.com. Reprinted by permission of Harvest, an imprint of HarperCollins Publishers.